
Most breaches we get called in for weren't clever. A package sat unpatched for months, SSH accepted passwords from the whole internet, or a panel login reused a password that had leaked from another site years earlier. Bots scan the internet for exactly these gaps around the clock, and they don't care how small your business is.
This guide covers both sides: why websites and servers get hacked, and the checklist we apply to close those doors. Every command and config below was tested on Ubuntu 26.04 LTS with OpenSSH 10.2, nginx 1.28, ufw, fail2ban 1.1 and OpenSSL 3.5. Ubuntu 24.04 works the same way, with one nginx difference noted in the TLS section.
The checklist
- Patch the CMS, plugins and the OS fast, and turn on automatic security updates.
- Use long unique passwords from a password manager, plus 2FA or passkeys.
- Log in to SSH with keys only and disable root login.
- Close every port you don't need with ufw.
- Ban brute-force sources with fail2ban.
- Serve HTTPS only with TLS 1.2 and 1.3, and turn on HSTS.
- Send security headers.
- Give every user, process and database account only the access it needs.
- Keep 3-2-1 backups off the server and test restores.
- Watch logs, scan for malware and alert on changes.
- Put a WAF or CDN in front and let only it reach the origin.
Why websites and servers get hacked
Known vulnerabilities in outdated software
Exploiting known, already-patched vulnerabilities is one of the most common ways in. Verizon's Data Breach Investigations Report puts it next to stolen credentials as a top entry point year after year.
The reason is simple. Once a fix ships, the vulnerability is public. Attackers don't need anything fancy: a bot that walks through known flaws and tries each one on every site it finds is enough. If your CMS, plugin or server package is a few versions behind, the bot doesn't have to be smart.
Zero-day vulnerabilities
A zero-day is a flaw nobody responsible for the product knows about yet, so there is no patch. These are harder to find and usually aimed at bigger targets, but when one is used against you, the only things standing in the way are the other layers: a WAF that can block the pattern, a firewall that hides what shouldn't be public, and permissions that limit what the attacker can touch.
Plugins and extensions
WordPress, Magento, OpenCart and most other CMSs let you add features with plugins. Every plugin is someone else's code running with full access to your site and data. Some are poorly maintained, some are abandoned, and some "nulled" copies from random download sites are malware with a plugin wrapper.
Weak and reused passwords
Credential stuffing works because people reuse passwords. When one site leaks, attackers try the same email and password everywhere else. Default logins like admin/admin still turn up on live sites, too.
Bad code
Your own code is a plugin too. SQL injection, file uploads without checks and missing access control are still in the top risks for web apps. Code review, dependency scanning and testing catch most of it before it ships.
1. Patch fast and turn on automatic security updates
Update the CMS core, plugins and themes as soon as security releases come out. Delete plugins and themes you don't use: deactivated code can still be reached and exploited.
When you choose a plugin, check when it was last updated, how many active installs it has and how the author handled past security reports. A plugin with no release in a year is a red flag.
Before going live, go through the CMS security settings instead of trusting the defaults. Check who can install extensions, who can edit code from the admin panel and which features you can turn off. Our WordPress security hardening guide walks through this for WordPress.
On the server, let Ubuntu install security updates on its own with unattended-upgrades:
shell
1sudo apt install unattended-upgrades2sudo dpkg-reconfigure -plow unattended-upgradesAnswer "Yes". This writes /etc/apt/apt.conf.d/20auto-upgrades, which turns on the daily package list refresh and the daily upgrade run. By default only the release and security pockets are allowed.
Security updates for the kernel, OpenSSL or glibc only take effect after a reboot. Put your own settings in a separate file so package upgrades never overwrite them:
shell
1sudo tee /etc/apt/apt.conf.d/52unattended-upgrades-local <<'EOF'2Unattended-Upgrade::Remove-Unused-Kernel-Packages "true";3Unattended-Upgrade::Remove-Unused-Dependencies "true";4Unattended-Upgrade::Automatic-Reboot "true";5Unattended-Upgrade::Automatic-Reboot-Time "04:00";6Unattended-Upgrade::SyslogEnable "true";7EOFIf a reboot at 04:00 isn't acceptable for this server, set Automatic-Reboot to "false" and schedule reboots yourself. Check what would be installed and that the timers are active:
shell
1sudo unattended-upgrade --dry-run --debug2systemctl list-timers 'apt-daily*'The dry run prints the allowed origins and the packages it would upgrade. The log of real runs is in /var/log/unattended-upgrades/.
2. Use strong passwords, a password manager and 2FA
The old advice about short passwords with symbols, digits and capitals is outdated. NIST's current guidance, SP 800-63B, says:
- Length beats complexity. A password used as the only factor should be at least 15 characters. A passphrase of several random words is long and still easy to type.
- No forced composition rules. Systems shouldn't require a mix of character types. People respond with predictable patterns like
Summer2026!. - No forced rotation. Change a password when there is a sign it was compromised, not every 90 days.
- Check against breached passwords. New passwords should be compared with lists of common and leaked passwords. The free Pwned Passwords service lets you do that without sending the password itself.
- Allow password managers and paste. Blocking paste only pushes people to shorter passwords.
Unique matters as much as long. One password for everything means one leak opens everything.
Nobody remembers dozens of 20-character passwords, so use a password manager. KeePassXC is free, open source and keeps an encrypted file on your device. KeePass is the free Windows original it grew from. Bitwarden syncs between devices, has a free plan and is open source. 1Password is a paid service popular with teams.
Then add a second factor everywhere it's offered: the CMS admin, hosting and cloud consoles, DNS registrar, email and Git hosting. An authenticator app or a hardware key is much stronger than SMS. Passkeys are better still where a service supports them, because they can't be phished or reused.
3. Lock down SSH
Passwords on SSH are the first thing bots try. Switch to keys, then turn passwords and root login off.
Create a sudo user and add your key
On the server, create a regular user for yourself and give it sudo rights:
shell
1sudo adduser deploy2sudo usermod -aG sudo deployOn your own computer, create a key and copy it to the server:
shell
1ssh-keygen -t ed25519 -a 100 -C "you@laptop"2ssh-copy-id deploy@your-server3ssh deploy@your-serverThe last command should log you in without asking for the server password. Protect the key itself with a passphrase.
Disable password and root login
Ubuntu reads files from /etc/ssh/sshd_config.d/ before the rest of sshd_config, and for each setting the first value wins. Cloud images often ship a file like 50-cloud-init.conf with PasswordAuthentication yes. Name your file so it sorts first:
shell
1sudo nano /etc/ssh/sshd_config.d/00-hardening.confshell
1PermitRootLogin no2PasswordAuthentication no3KbdInteractiveAuthentication no4PubkeyAuthentication yes5AuthenticationMethods publickey6MaxAuthTries 37LoginGraceTime 308X11Forwarding no9AllowUsers deployAllowUsers is optional, but it means any other account, including ones a compromised app creates, can't log in over SSH. List every user who needs SSH, separated by spaces.
⚠️ We tested the same settings in a file named 99-hardening.conf next to a cloud-init file: sshd -T still showed passwordauthentication yes. The file name matters.
Test before you log out
Check the syntax and the values SSH will actually use, then reload:
shell
1sudo sshd -t2sudo sshd -T | grep -E '^(permitrootlogin|passwordauthentication|kbdinteractiveauthentication|authenticationmethods|allowusers) '3sudo systemctl reload sshsshd -t prints nothing when the config is valid and names the file and line when it isn't. Keep your current session open and test from a second terminal:
shell
1ssh deploy@your-server2ssh -o PubkeyAuthentication=no deploy@your-server3ssh root@your-serverThe first command should log you in. The other two should end with Permission denied (publickey).
OpenSSH 9.8 and newer (Ubuntu 26.04 ships 10.2) also slow down sources that keep failing to log in on their own, through the PerSourcePenalties setting. It's on by default. fail2ban below adds longer bans at the firewall.
4. Close every port you don't need with ufw
A server should accept connections only on the ports it actually serves. On Ubuntu the simplest way is ufw, a front end for the kernel's nftables firewall:
shell
1sudo ufw default deny incoming2sudo ufw default allow outgoing3sudo ufw allow OpenSSH4sudo ufw allow "Nginx Full"5sudo ufw enable6sudo ufw status verboseAllow SSH before you run ufw enable, or you lock yourself out. Nginx Full opens 80 and 443. Use sudo ufw app list to see the other profiles installed packages provide. Databases, Redis, admin panels and monitoring agents should listen on 127.0.0.1 or a private network, never on a public port.
A few things worth knowing:
- Docker bypasses ufw. Ports published with
docker run -pare routed before ufw's rules see the traffic, so a published container port is open to the world even if ufw says otherwise. Bind such ports to127.0.0.1and put nginx in front, or filter in theDOCKER-USERchain. See Docker's notes on packet filtering and firewalls. ufw limitis a blunt tool.sudo ufw limit OpenSSHrejects an IP that opens 6 or more connections in 30 seconds. In our test it worked, but it also blocks Ansible runs,scploops and Git over SSH from your own CI. With key-only SSH and fail2ban,allowis the better default.- On a cloud VM, also use the provider's firewall (security groups on AWS, firewall rules on GCP). It keeps traffic away from the server entirely and survives a mistake in ufw.
5. Ban brute-force sources with fail2ban
fail2ban watches the logs and bans IPs that keep failing to log in. On Ubuntu the package already enables an SSH jail that reads the systemd journal and bans with nftables:
shell
1sudo apt install fail2ban nftablesInstall nftables explicitly. fail2ban only recommends it, and on minimal images where iptables is already present apt skips it. In our test fail2ban then logged Ban but blocked nothing, because the nft command it calls didn't exist.
The default jail misses one thing on key-only servers. In its default normal mode, failed public key attempts for an existing user aren't counted. In our test, three attempts with a wrong key against deploy left the failure counter at zero. aggressive mode counts them. Put your settings in a separate file:
shell
1sudo tee /etc/fail2ban/jail.d/sshd.local <<'EOF'2[DEFAULT]3bantime = 1h4findtime = 10m5maxretry = 56bantime.increment = true7bantime.maxtime = 1w8ignoreip = 127.0.0.1/8 ::19
10[sshd]11enabled = true12mode = aggressive13EOFbantime.increment makes each repeat ban longer, up to a week. Add your office or VPN address to ignoreip, separated by a space, so a typo doesn't ban you. Test the config, restart and check the jail:
shell
1sudo fail2ban-client -t2sudo systemctl restart fail2ban3sudo fail2ban-client status sshdAfter five failed attempts from one IP within ten minutes, the IP shows up under Banned IP list and new connections to port 22 are refused. Make sure the ban really reached the firewall:
shell
1sudo nft list set inet f2b-table addr-set-sshdThe banned IP should be listed under elements. To let someone back in:
shell
1sudo fail2ban-client set sshd unbanip 203.0.113.10fail2ban also ships filters for nginx, mail servers and many web apps. If you have a login page that gets hammered, a jail on its log is worth adding.
6. Serve HTTPS only: TLS 1.2, TLS 1.3 and HSTS
TLS encrypts traffic between the browser and the server, so nobody in the middle can read or change it. It doesn't stop attacks on the site itself, but without it passwords and session cookies travel in clear text, and browsers mark the site as not secure.
Get a free certificate from Let's Encrypt, see our guide on installing Let's Encrypt on Ubuntu. Then set up nginx so plain HTTP only redirects to HTTPS and HTTPS uses current protocols only. Here is a complete server config for your site in /etc/nginx/sites-available/:
nginx
1server {2 listen 80;3 listen [::]:80;4 server_name example.com www.example.com;5 return 301 https://example.com$request_uri;6}7
8server {9 listen 443 ssl;10 listen [::]:443 ssl;11 http2 on;12 server_name example.com;13
14 ssl_certificate /etc/letsencrypt/live/example.com/fullchain.pem;15 ssl_certificate_key /etc/letsencrypt/live/example.com/privkey.pem;16
17 ssl_protocols TLSv1.2 TLSv1.3;18 ssl_ciphers ECDHE-ECDSA-AES128-GCM-SHA256:ECDHE-RSA-AES128-GCM-SHA256:ECDHE-ECDSA-AES256-GCM-SHA384:ECDHE-RSA-AES256-GCM-SHA384:ECDHE-ECDSA-CHACHA20-POLY1305:ECDHE-RSA-CHACHA20-POLY1305;19 ssl_prefer_server_ciphers off;20 ssl_session_timeout 1d;21 ssl_session_cache shared:SSL:10m;22 ssl_session_tickets off;23
24 add_header Strict-Transport-Security "max-age=63072000; includeSubDomains" always;25 add_header X-Content-Type-Options "nosniff" always;26 add_header X-Frame-Options "SAMEORIGIN" always;27 add_header Referrer-Policy "strict-origin-when-cross-origin" always;28 add_header Permissions-Policy "camera=(), microphone=(), geolocation=()" always;29 add_header Content-Security-Policy-Report-Only "default-src 'self'; frame-ancestors 'self'" always;30
31 root /var/www/example.com/public;32 index index.html index.php;33
34 location ~ /\.(?!well-known/) {35 deny all;36 }37
38 location / {39 try_files $uri $uri/ =404;40 }41}The cipher list is Mozilla's "intermediate" profile from their SSL configuration generator. It allows TLS 1.2 with forward secrecy and AEAD ciphers only. TLS 1.3 picks its own strong ciphers. The location ~ /\. block returns 403 for .env, .git and other hidden files while still serving .well-known for Let's Encrypt. If people also open the www name over HTTPS, it needs a certificate and its own server block that redirects to the main name. For more redirect options, see how to redirect HTTP to HTTPS in nginx.
Two changes go into /etc/nginx/nginx.conf, so every site on the server gets them:
nginx
1server_tokens off;2ssl_protocols TLSv1.2 TLSv1.3;Replace the existing lines in the http block. Ubuntu 26.04 ships server_tokens build;, which adds the exact nginx version to every response, including the port 80 redirect. Ubuntu 24.04 ships ssl_protocols TLSv1 TLSv1.1 TLSv1.2 TLSv1.3; in that file.
⚠️ On Ubuntu 24.04, nginx 1.24 doesn't know http2 on;. Remove that line and write listen 443 ssl http2; and listen [::]:443 ssl http2; instead.
Enable the site, test and reload:
shell
1sudo ln -s /etc/nginx/sites-available/example.com /etc/nginx/sites-enabled/2sudo nginx -t3sudo systemctl reload nginxNow check it from outside:
shell
1curl -sI http://www.example.com/2curl -sI https://example.com/3openssl s_client -connect example.com:443 -servername example.com -tls1_3 -brief </dev/null4openssl s_client -connect example.com:443 -servername example.com -tls1_1 -cipher 'DEFAULT@SECLEVEL=0' </dev/nullThe first returns 301 with Location pointing to HTTPS. The second returns 200 with all the headers from the config. The TLS 1.3 check prints Protocol version: TLSv1.3. The TLS 1.1 check must fail with alert protocol version, which means the server refused.
Keep the -cipher 'DEFAULT@SECLEVEL=0' part. Without it, OpenSSL on a current Ubuntu refuses TLS 1.1 on the client side with no protocols available, and you learn nothing about the server. For a full report, run the public test from SSL Labs.
About HSTS. Strict-Transport-Security tells browsers to use only HTTPS for your domain for the next two years, even if someone types http://. With includeSubDomains that applies to every subdomain, so make sure all of them have valid certificates first. If you're unsure, start with max-age=300, then raise it. Add preload and submit the domain to the HSTS preload list only when you're sure: removal takes months.
7. Send security headers
The same server block sets the headers that close common browser-side attacks:
X-Content-Type-Options: nosniffstops browsers from guessing file types, so an uploaded "image" can't run as a script.X-Frame-Options: SAMEORIGINstops other sites from loading yours in a frame for clickjacking.Referrer-Policy: strict-origin-when-cross-originkeeps full URLs, which can contain tokens, from leaking to other sites.Permissions-Policyturns off browser features the site doesn't use, like the camera and microphone.Content-Security-Policycontrols where scripts, styles and frames can load from. It's the strongest defence against XSS and also the easiest to break a site with. Start withContent-Security-Policy-Report-Only, watch the browser console and reports, and switch to the enforcing header once nothing legitimate is blocked.
The always flag adds headers to error pages too. One nginx trap: if a location block has its own add_header, it drops every header inherited from the server block. Repeat the headers there or move them into a file you include in both places. The OWASP Secure Headers project lists current recommended values.
8. Give everything the least privilege it needs
Each account, process and file should have only the access its job requires. When something gets compromised, this decides how far the attacker gets.
- People. Everyone gets a personal account, no shared logins. Admin rights only for those who need them, and remove access the day someone leaves. Log who did what in the CMS and on the server.
- sudo. Work as a regular user and use
sudofor single commands. Don't giveNOPASSWDto humans. - Web files. The code shouldn't be writable by the web server. Only the uploads folder should be.
- PHP. Run each site in its own PHP-FPM pool under its own user, block PHP execution in uploads and turn off functions the app doesn't need. See disabling dangerous PHP functions.
- Database. One database user per app, with rights on its own database only and no access from outside the server.
- Temporary directories. Mount
/tmpwithnoexec,nosuidandnodevso malware can't run from there. Our guide on securing /tmp on a Linux server has the steps.
For a typical site, file ownership looks like this:
shell
1sudo chown -R deploy:www-data /var/www/example.com2sudo find /var/www/example.com -type d -exec chmod 750 {} +3sudo find /var/www/example.com -type f -exec chmod 640 {} +4sudo chown -R www-data:www-data /var/www/example.com/public/uploadsThe deploy user owns the code, nginx and PHP read it through the www-data group, other users on the server can't read it at all, and only uploads is writable by the web server.
9. Keep backups off the server and test restores
A backup on the same server dies with the server. It's also a gift to attackers: old copies hold old, unpatched code and often database dumps with every customer record. Ransomware deletes local backups first.
Follow the 3-2-1 rule: 3 copies of your data, on 2 different types of storage, with 1 copy off-site. Today that usually means the live server, snapshots at the hosting provider, and an encrypted copy in object storage in another account or region, ideally with versioning or object lock so an attacker with server access can't delete it.
restic is a free, open source tool that does encrypted, deduplicated backups to S3-compatible storage, SFTP and other targets. Install it and become root, since the backup reads files only root can read:
shell
1sudo apt install restic2sudo -iThen create the repository password and run the first backup. Use the S3 endpoint of your bucket's region:
shell
1openssl rand -base64 32 > /root/.restic-pass2chmod 600 /root/.restic-pass3export AWS_ACCESS_KEY_ID=your-access-key-id4export AWS_SECRET_ACCESS_KEY=your-secret-access-key5export RESTIC_REPOSITORY=s3:s3.us-east-1.amazonaws.com/your-backup-bucket/web16export RESTIC_PASSWORD_FILE=/root/.restic-pass7restic init8restic backup /var/www /etc/nginx /etc/ssh/sshd_config.d /etc/fail2ban/jail.d9restic forget --keep-daily 7 --keep-weekly 4 --keep-monthly 6 --prune10restic checkThe access key should belong to a user that can only work with that one bucket. Store the restic password in your password manager as well: without it the backups can't be decrypted. Back up the database as a dump, not as raw files, and run the whole thing from a nightly cron job or systemd timer.
Until you've restored from a backup, you don't know it works. Restore on a schedule and compare:
shell
1restic restore latest --target /root/restore-test2diff -r /var/www /root/restore-test/var/www && echo "restore OK"Better still, restore into a fresh server once a quarter and check the site actually runs. Then you also know how long recovery takes.
10. Watch logs and monitor
You can't respond to what you don't see. At a minimum, know who logs in and what gets banned:
shell
1sudo journalctl -u ssh --since "24 hours ago" | grep "Accepted publickey"2sudo fail2ban-client status sshdEvery successful login should be one you recognise. On more than one server, ship logs to a central place (Grafana Loki, Elasticsearch or your cloud provider's log service), so an attacker who gets root can't simply delete the evidence.
Set up alerts for:
- Uptime and response time from outside your network.
- Certificate expiry, two to three weeks ahead.
- Changes to core files and configs. File integrity tools like AIDE, or a simple checksum job, catch injected code that doesn't break the site.
- Malware. Scan uploads and web roots on a schedule. Our guide to Linux Malware Detect covers setup with ClamAV.
- DNS changes and blacklists. Google Search Console warns you when Google flags the site as hacked or deceptive.
- Disk, CPU and traffic spikes. Hidden crypto miners and spam scripts show up here first.
11. Put a WAF or CDN in front
A Web Application Firewall (WAF) inspects HTTP requests and blocks the ones that match attack patterns: SQL injection, XSS, known exploit paths and bad bots. A CDN in front adds DDoS protection and hides your server's real IP.
The main options:
- Cloudflare. The free plan includes DDoS protection and a free managed WAF ruleset. The full managed rulesets need a paid plan.
- Cloud provider WAFs, such as AWS WAF on CloudFront or a load balancer. Paid per rule and per request.
- Self-hosted and free: the OWASP Core Rule Set running in ModSecurity or Coraza in front of your app.
A WAF is not a patch. It can reduce exposure through virtual patching until the vendor ships a fix, but a new exploit that doesn't match any rule goes straight through. Keep patching.
A CDN only protects you if attackers can't go around it. Once the site works through the CDN, let only the CDN's IP ranges reach ports 80 and 443. For Cloudflare:
shell
1for ip in $(curl -fsS https://www.cloudflare.com/ips-v4) $(curl -fsS https://www.cloudflare.com/ips-v6); do2 sudo ufw allow proto tcp from "$ip" to any port 80,443 comment "Cloudflare"3done4sudo ufw delete allow "Nginx Full"5sudo ufw statusIn our test, direct requests to the origin timed out afterwards while SSH kept working. Cloudflare changes these ranges rarely, but it does change them, so re-run this from time to time. Also make sure no old DNS record, mail header or subdomain still reveals the origin IP.
How the layers fit together
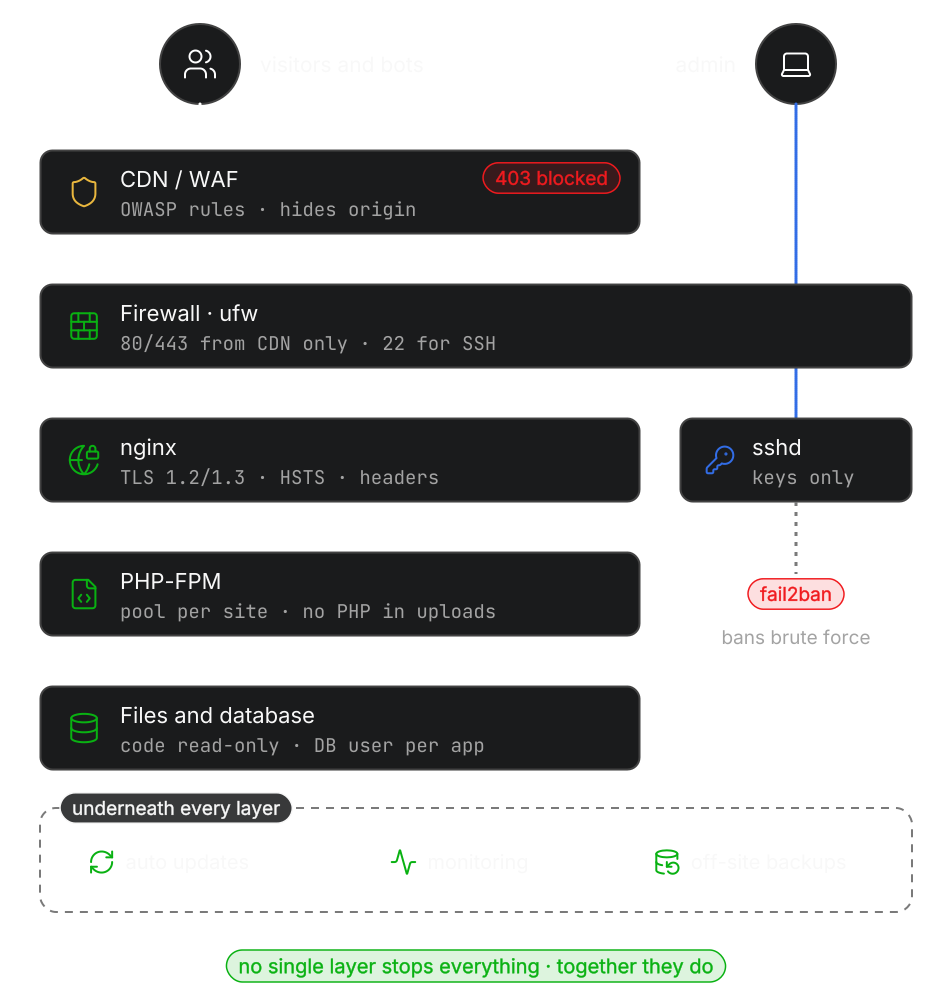
No single layer stops everything. They work as a chain. The WAF or CDN filters bad requests and absorbs floods. The firewall lets through only the CDN and your SSH. SSH accepts only keys, and fail2ban bans whoever keeps trying. nginx serves TLS only, sends security headers and blocks hidden files. PHP runs with limited functions and can write only to uploads. Underneath, automatic updates close known holes, monitoring tells you when something changes, and off-site backups are the last line when everything else fails.
When to bring in help
Experienced admins can work through this list on their own. If you'd rather have someone else do it, or you already see signs of a breach, our cloud security and compliance team hardens servers and cloud accounts, sets up monitoring and alerting, and helps you recover after an incident. Get in touch through that page and tell us what you're running.